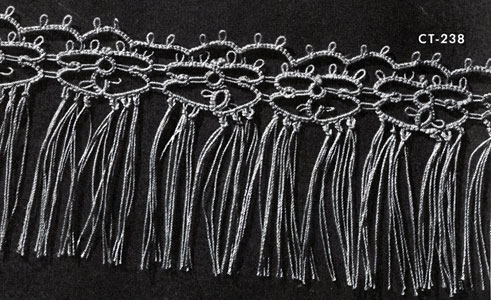
Tatted Edging Pattern #CT-238

MATERIALS: J. & P. Coats Tatting-Crochet, Size 70.
Tie ball and shuttle threads together. FIRST MOTIF … Lr of (4 ds, p) 3 times, 4 ds, cl. Rw, ch of 3 ds, 4 p's sep by 3 ds, 3 ds. Rw, sm r of 3 ds, join to last p of lr, 3 ds, cl. Rw, ch as before. Rw, lr of 4 ds, p, 4 ds, join to center p of previous lr, 4 ds, p, 4 ds, cl. Rw, ch as before. Rw, sm r of 3 ds, join to free p of first lr, 3 ds, cl. Rw, ch as before. Join to base of first r. Tie and cut.
SECOND MOTIF … Work as for First Motif until 3 p's of first ch are made, 3 ds, join to corresponding p of adjacent ch of First Motif, 3 ds. Rw, sm r of 3 ds, join to last p of lr, 3 ds, cl. Rw, ch of 3 ds, join to corresponding p of adjacent ch of First Motif. Complete as for First Motif (no more joinings). Make necessary number of motifs, joining them as Second Motif was joined to First Motif.
HEADING … Fasten ball and shuttle threads to 3rd p of last ch of First Motif. * Ch of 5 ds, 2 p's sep by 5 ds, 5 ds, skip 2 p's, join to next p. Repeat from * across. Tie and cut.
FRINGE … Cut 2 strands of thread, each 3 inches long. Double these strands, thus forming a loop. Pull loop through a free picot on scalloped edge, then draw loose ends through loop. Pull up tightly. Make a fringe in each free picot across. Trim ends evenly.
Seed Pearls Mat Pattern
Saturn Ring Doily Pattern
Lover's Knot Doily Pattern
Frosted Star Doily Pattern
Filigree Scroll Mat Pattern
Maypole Dance Mat Pattern
Butterfly Motif Pattern
Tatted Edging Pattern
Tatted Edging Pattern
Tatted Edging Pattern
Tatted Edging Pattern
Tatted Edging Pattern
Tatted Edging Pattern
Pleasure Bent Collar & Cuffs Pattern
Diamond Setting Doily Pattern
Sea Froth Doily Pattern
Handkerchief Edging Pattern
Pineapple Edging Pattern
Butterfly Motif Pattern
Breakfast Time Mat and Napkin Edging & Insertion Pattern
Bright Cluster Chair Set Pattern
Office Bound Collar & Cuffs Pattern


