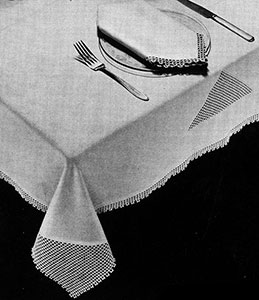
Trellis Luncheon Set Pattern #7005

Materials: Clark's O.N.T. (14 balls) or J. & P. Coats (10 balls) Mercerized Crochet, size 30, White or Ecru.
Milward's steel crochet hook No. 10.
1⅓ yds. of 72-inch wide linen.
When completed cloth measures 48 inches square and 4 napkins, each 12 inches square. Cut linen 48 inches square for cloth and 12 inches square for each of 4 napkins.
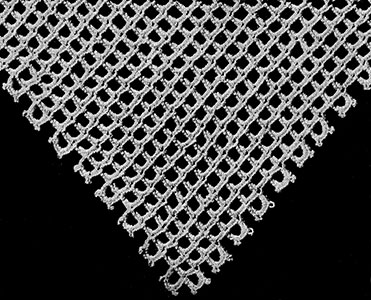
Cloth. Triangle Insert: Ch 12, join with sl st to form ring. Hereafter, the right side of work is always facing you. Do not turn at end of rows. 1st row: 4 s c in ring, ch 2, 4 s c in ring, ch 2, 2 s c in ring. 2nd row: Ch 12, remove hook and draw loop under ch-2, 4 s c in ch-12, ch 7, remove hook and draw loop under next ch-2 (top of loop), 4 s c in ch-7, ch 2, 4 s c in same ch-7 (thus filling top of second square). Ch 2, 4 s c in ch-12, ch 2, 2 s c in same ch-12. 3rd row: Ch 12, remove hook and draw loop under 1st ch-2, 4 s c in ch-12. Ch 7, draw loop under next ch-2, 4 s c in ch-7, then ch 7, draw loop under last ch-2, 4 s c, ch 2, 4 s c in same ch-7. Ch 2, 4 s c in next ch-loop. Ch 2, 4 s c in ch-12, ch 2, 2 s c in ch-12. 4th row: Ch 12, continue to increase until 27 rows are made. On last ch-12 make: 4 s c, ch 2, 5 s c, ch 2, 4 s c, ch 2. In each loop along base of triangle work 4 s c and ch 2. Fasten and break off. Make 3 more triangle inserts.
Triangle Corner: Ch 12, join with sl st to form ring. 1st row: Work 4 s c, ch 2, 4 s c in ring. The right side of work is always facing you. Do not turn at end of rows. Ch 7, remove hook and draw loop under ch-2, 4 s c in ch-7, ch 2, 4 s c in same ch-7. Ch 7, remove hook and draw loop under ch-2, 4 s c in ch-7. Ch 2, 4 s c in same ch-7. Ch 2, across top of row work: 4 s c, ch 2, 4 s c, ch 2, 4 s c, ch 2, 2 s c. 2nd row: Ch 12, remove hook and draw loop under 1st ch-2, 4 s c in ch-12, ch 7, remove hook and draw loop under next ch-2, 4 s c in ch-7. Ch 7, remove hook and draw loop under next ch-2, 4 s c in ch-7, ch 7, remove hook and draw loop under next ch-2, 4 s c in ch-7, ch 9, remove hook and draw loop under ch-2 which is just before 4 s c just made (to form scallop at the top), 4 s c in ch-9, ch-4 p, 4 s c in ch-9, p, 4 s c in ch-9, then across top of row work: ch 2, 4 s c, ch 2, 4 s c, ch 2, 4 s c. Ch 2, over ch-12 work: 4 s c, ch 2, 2 s c. 3rd row: Ch 12, remove hook and draw loop under 1st ch-2, 4 s c in ch-12, ch 7, remove hook and draw loop under next ch-2, 4 s c in ch-7, ch 7, remove hook and draw loop under next ch-2, 4 s c in ch-7, ch 7, remove hook and draw loop under next ch-2, 4 s c in ch-7, ch 7, remove hook and draw loop under next ch-2, 4 s c in ch-7, ch 2, 4 s c in same ch-7. Then across top of row work: ch 2, 4 s c, ch 2, 4 s c, ch 2, 4 s c, ch 2. Over ch-12 work: 4 s c, ch 2, 2 s c. 4th row: Ch 12, remove hook and draw loop under 1st ch-2, 4 s c in ch-12, * ch 7, remove hook and draw loop under next ch-2, 4 s c in ch-7. Repeat from * 4 more times. Ch 9 (for scallop), and complete it as in 2nd row. Then across top of row work as before, ch 2, 4 s c and so on. Continue to widen in this manner, until 16 scallops are made. Work next row across as before but in the last ch-12 work only ch 2 and 4 s c (thus omitting the ch 2 and 2 s c in order to stop increasing). Ch 12, work across as before, but coming back in last ch-12 work ch 2 and 4 s c (again omitting the ch 2 and 2 s c), ch 12. Thus work back and forth without increasing until the row which makes the 17th scallop is made; but coming back on this row, make 17 scallops to correspond with the other side (the first scallop of this row forming one of the two scallops at corner). After the 17th scallop is completed on this row, there will be 3 sps across in a short row which will form the beginning of the edging. Work over these 3 sps as follows: Ch 2, 4 s c in next sp, ch 2, 4 s c in next sp, ch 2, 4 s c in next sp. This completes Corner Triangle both sides of which should measure the same. If not, pull in place as s c's slip easily on the ch's. Do not break off. Place this Triangle Corner over linen so that it fits exactly into the corner, and pin in place at base of triangle. Cut away linen underneath triangle, allowing ¾ inch to make a hem. Take away pins and cut the other three corners to correspond. Then make a ½ inch hem all around linen. Continue for edging over the 3 sps as follows:
Edging. 1st row: Ch 12, remove hook and draw loop under ch-2, 4 s c in ch-12, ch 7, remove hook and draw loop under next ch-2, 4 s c in ch-7, ch 7, remove hook and draw loop under next ch-2, 4 s c in ch-7, ch 2, 4 s c in same ch-7, ch 2, 4 s c in next sp, ch 2, 4 s c in next sp. 2nd row: Ch 12, remove hook and draw loop under ch-2, 4 s c in ch-12, ch 7, remove hook and draw loop under next ch-2, 4 s c in ch-7, ch 7, remove hook and draw loop under next ch-2, 4 s c in ch-7, ch 9 (for scallop), complete scallop and work over the next 2 sps as before, in the last sp make ch 2 and 4 s c, ch 12 and continue thus back and forth without increasing and making a scallop in every other row until edging measures the same as one side of linen. Now begin increasing for another triangle corner as the previous one, and thus work around.
Sew crochet work around linen, with over-and-over stitches. Place one Triangle Insert in center of each side, 3 inches in from edge of linen (as in illustration). Sew with over-and-over stitches. Cut away linen underneath triangle, leaving ½ inch for finishing and make a hem on wrong side.
Napkin. Make a ½ inch hem all around napkin. Work edging as for triangle corner but having only 2 sps instead of 3 sps.

Century Luncheon Set Pattern
Square-a-Day Tablelcoth Pattern
Flower Wheel Tablecloth Pattern
Regent Dinner Cloth Pattern
Tudor Dinner Cloth Pattern
Occasional Doily Pattern
Venetian Doily Pattern
Climbing Rose Tablecloth Pattern
Cobweb Doily Luncheon Set Pattern
Wild Rose Tray Mat Pattern
Pinwheel Tablecloth Pattern
Daffodil Luncheon Set Pattern
Garden Fern Luncheon Set Pattern
Brookside Luncheon Set Pattern
Four Square Luncheon Set Pattern
Trellis Luncheon Set Pattern
Mosaic Tablecloth Pattern
Leaf Luncheon Set Pattern
Mexicana Luncheon Set Pattern


