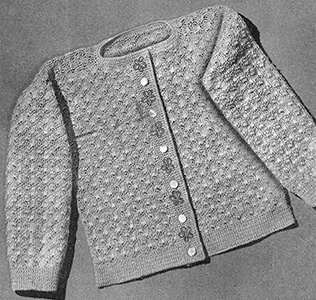
Cardigan Pattern #5212

Toddler Size 2
MATERIALS:
CLARK'S O.N.T. "BRILLIANT," 16 balls.
Steel Crochet Hook No. 5.
J. & P. COATS or CLARK'S O.N.T. SIX STRAND COTTON, 1 skein of contrasting color for embroidery.
Buttons.
Snap fasteners.
GAUGE: 2 shells make 1¼ inches; 7 rows make 2 inches.
BACK … Starting at bottom ch 92, to measure 10 inches. 1st row: Sc in 2nd ch from hook and in each ch across (91 sc). Ch 1, turn. 2nd row: Sc in each sc across. Ch 1, turn. Repeat 2nd row for 1 inch; then work in pattern as follows: 1st row: Sc in 1st sc, * skip 2 sc, 5 tr in next sc, skip 2 sc, sc in next sc (shell made). Repeat from * across, ending with sc (15 shells). Ch 4, turn. 2nd row: 2 tr at base of ch-4 (half shell made at beginning of row). * Sc in center tr of next shell, 5 tr in next sc. Repeat from * across, ending with 3 tr in last sc (half shell made at end of row). Ch 1, turn. 3rd row: Sc in 1st tr, * 5 tr in next sc, sc in center tr of next shell. Repeat from * across, ending with sc at top of turning ch. Ch 4, turn. Repeat 2nd and 3rd rows alternately for 9 inches, ending with row which has a complete shell at each end, turn. Fasten off. Next row: Skip 4 shells, attach thread to next sc, ch 4, 2 tr n same place, sc in center of next shell, work 6 shells, then work 3 tr in next sc. Ch 1, turn. Work 2 more rows in pattern over the center 7 shells. Fasten off.
FRONT (Make 2) … Starting at the bottom, ch 44 (to measure 5 inches) and work as for Back (having 43 sc in sc row, and 7 shells in 1st row of shells) until piece measures 10 inches in all. Fasten off.
SLEEVES ... Ch 68 to measure 7½ inches. 1st row: Sc in 2nd ch from hook, * skip 2 ch, 5 tr in next ch, skip 2 ch, sc in next ch. Repeat from * across, ending with sc (11 shells). Ch 4, turn. Work in shell pattern as on Back until piece measures 9½ inches, ending with row which has half shell at each end of row. Turn. Fasten off. Next row: Attach thread to center of 4th complete shell, sc in same place, (5 tr in next sc, sc in center of next shell) 3 times; ch 4, turn (3 shells). Continue to work in pattern over these 3 shells only for 2¾ inches, for shoulder insert. Fasten off.
CUFF … Work a row of sc along bottom of sleeve, holding work in to measure 5 inches. Ch 1, turn. 2nd row: Sc in each st across. Ch 1, turn. Repeat 2nd row for 1 inch. Fasten off.
RIGHT FRONT BAND … Starting at top, work a row of sc along front edge, working 1 sc in each sc, 1 sc in each ch of ch-4, and 4 sc in each tr (be careful to keep work flat). Ch 1, turn. 2nd row: Sc in each sc across. Ch 1, turn. Repeat 2nd row 3 more times. Ch 1, turn. Next row: Sc in 4 sc, * ch 3, skip 3 sc, sc in 12 sc. Repeat from * across. Ch 1, turn. Following row: Work sc in each sc and 3 sc in each ch-3 across. Ch 1, turn (buttonholes made). Continue to work sc in each sc until band measures 1 inch. Fasten off.
LEFT FRONT BAND … Same as Right Front Band, omitting buttonholes.
FINISHING … Press pieces lightly with hot iron through damp cloth. Sew shoulder inserts between shoulders of Back and Front. Sew top of sleeves to armhole edges of Back and Front. Sew side and sleeve seams with one continuous seam. Work a row of sc around neck edge, keeping work flat. Ch 1, turn. Continue to work sc in each sc around, decreasing to keep work flat, until neckband measures ½ inch. Fasten off. Steam seams and neckband. With Six Strand Cotton, embroider flowers in lazy daisy stitch as in illustration. Sew on buttons. Sew 2 snap fasteners at neck edge.
Sacque Pattern #5226
Coat Hangers Pattern
Cap and Booties Pattern
Toy Pattern
Soaker Pattern
Cardigan Pattern
Sacque and Cap Pattern
Sacque Pattern #5211
Set of Bibs Pattern
Bib Pattern #5222
Crazy Cat Pattern
Chair Pads Pattern
Rug and Matching Pictures Pattern
Bib Pattern #5215
Sun Suit Pattern
Soaker Pattern #5204
Soaker Pattern #5205
Basque Shirt and Socks Pattern
Shoes and Mitts Pattern
Sun Suit Pattern
Creeper Pattern


