Afghans Knit and Crochet | Book No. 127 | Coats & Clark's

Afghans Knit and Crochet
Book No. 127
Coats & Clark's
Original Copyright 1961
Patterns Included:
HOW TO MAKE AFGHAN STITCH …
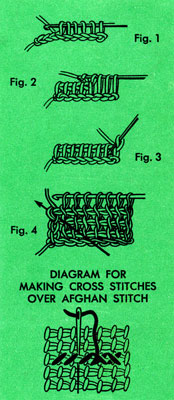
One reason for the great popularity of afghan stitch is that it is so easy to work. Basic afghan stitch consists of only one pattern row, worked in two halves—first a loop is picked up in each stitch across the row, then the loops are worked off two at a time. Below are step-by-step instructions that any beginner can follow to learn this attractive stitch.
Make a foundation chain of desired number of stitches. 1st row—First Half of Row: Retaining all loops on hook, draw up a loop in 2nd ch from hook and in each ch across (Fig. 1). There are the same number of loops on hook as there were chain sts. Second Half of Row: Yarn over and draw through 1 loop, * yarn over and draw through 2 loops. Repeat from * across (Fig. 2). The loop which remains always counts as the first st of next row (Fig. 3). 2nd row-First Half of Row: Retaining all loops on hook, draw up a loop in 2nd vertical bar (formed by loop of previous row) and in each vertical bar across to within last vertical bar (Fig. 4); insert hook through last vertical bar and the st directly behind it (arrow on Fig. 4) and draw up a loop (this gives a firm edge to this side). There are the same number of loops as on first row. Second Half of Row: Yarn over and draw through 1 loop, * yarn over and draw through 2 loops. Repeat from * across. Repeat 2nd row for pattern.
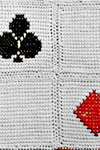
To complete Blocks sc around as follows: Being careful to keep work flat and working through vertical bar and the st directly behind it, sc around making 3 sc in each corner. Join with sl st to first sc. Break off and fasten.
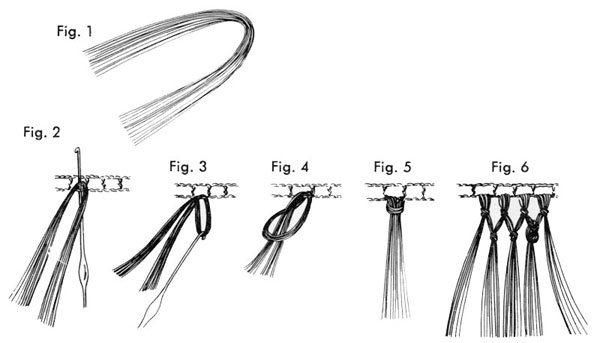
How to make fringe …
PLAIN FRINGE ... Cut desired number of strands as specified in directions. Double these strands to form a loop (Fig. 1). Insert hook (Fig. 2) at edge of afghan and draw loop through (Fig. 3). Draw loose ends through loop (Fig. 4) and pull up tightly to form a knot (Fig. 5). Make a fringe where designated in directions. When fringe is completed, trim ends evenly.
KNOTTED FRINGE ... Make a plain fringe where designated in directions (Figs. 1-5). Pick up half the strands of the first fringe and half the strands of the second fringe and make a knot (Fig. 6) 1 inch down and in the center between 2 previous knots. Pick up remaining strands of second fringe and first half of the strands of next fringe and knot as before. Continue in this manner around. Trim ends evenly.