Black Magic Luncheon Set Pattern #1
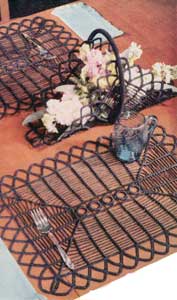
No. 1-LUNCHEON SET
LILY DOUBLE QUICK, Art. 50, in Black: 4 Place Mats-6 skeins; Flower Basket and Bun Holder-5 skeins; Cigarette Basket-½ skein; or
LILY SKY-TONE, Art. 123, in Black: 4 Mats-8 balls; Flower Basket and Bun Holder-7 balls; Cigarette Basket-1 ball.
No. 3 Steel Crochet Hook. Bone rings in 1 inch size. Black covered millinery wire or other stiff wire.
Use 1 strand of DOUBLE QUICK throughout, or 2 strands of SKY-TONE.
PLACE MAT (Size-15 x 20 inches):
CENTER: Starting in center, attach to 1 ring, ch 1, 32 sc in ring; join to 1st sc. Fasten off. Cover a 2d ring, join to 1st ring with sl st; fasten off. * Cover another ring, join to 16th sc on previous ring; fasten off; repeat from * twice (straight row of 5 rings).
RND 2: Attach to 12th sc on one end ring, ch 7, sk 3 sc, sc in next sc, * ch 4, sk 3 sc, dc in next sc, ch 4, sk 3 sc, sc in next sc, (ch 4, tr between rings, ch 4, sc in 8th sc on next ring) 4 times, ch 4, * sk 3 sc, dc in next sc, ch 4, sk 3 sc, sc in next sc; repeat from * to * ; join to 3d st of ch-7.
RND 3: Ch 1, 3 sc in same st, 5 sc in next sp, sc in next sc, 5 sc in next sp, 3 sc in corner dc, (5 sc in next sp, sc in next st) repeated around with 3 sc in corner dc; join to 1st sc.
BORDER: RND 1: Ch 1, sc in same sc, * ch 3, dc in next sc, ch 3, sc in next sc, ch 13, sk 11 sc, sc in 1st of 3 sc at next corner, ch 3, dc in next sc, ch 3, sc in next sc, (ch 13, sk 11 sc, sc in next sc) 5 times to 1st of 3 sc at next corner; repeat from * around; join to 1st sc.
RND 2: Ch 1, insert hook from front under bar of same sc, draw lp thru, Y 0, draw up a lp in same place, Y 0 and draw thru 4 lps on hook at same time (raised-sc-Cluster made); * ch 5, Y O, insert hook from front under bar of next dc, draw lp thru, Y 0 and draw thru 2 lps, Y 0, draw up a lp in same place, Y 0 and draw thru 2 lps, Y O and draw thru 3 lps on hook (raised-dc-Cluster made); ch 5, raised-sc-Cluster (rsd-sc-Cl) under bar of next sc, ** ch 13, rsd-sc-Cl under bar of next sc, repeat from * to ** ; (ch 13, rsd-sc-Cl under next sc) 5 times; repeat from * around; join with sl st in 1st rsd-sc-Cl.
RND 3: Ch 1, rsd-sc-Cl under same Cluster, * ch 7 (2 ch more than last rnd), rsd-dc-Cl under next Cluster, ch 7, rsd-sc-Cl under next Cluster, ** ch 13, rsd-sc-Cl under next Cluster; repeat from * to ** ; (ch 13, rsd-sc-Cl under next Cluster) 5 times; repeat from * around; join.
RNDS 4 thru 6: Repeat Rnd 3 increasing corner sps by 2 ch in each rnd (Rnd 6 - 13-chs in all sps).
RND 7: Ch 1, rsd-sc-Cl under same Cluster, * ch 13, sc-Cl in end ch of next sp; ch 3, rsd-dc-Cl under next Cluster ch 3, sc-Cl in 1st ch of next sp, ** (ch 13, rsd-sc-Cl under next Cluster) twice; repeat from * to **; (ch 13 rsd-sc-Cl under bar of next Cluster) 6 times; repeat from * around; join.
RNDS 8 thru 12: Continue in same way, increasing corner sps 2 ch in each rnd (Rnd 12 - 13-chs in all sps).
RND 13: Ch 1, rsd-sc-Cl under same Cluster, ch 13, rsd-sc-Cl under next Cluster, repeat Rnd 7 from * to ** then continue around in same way adding 2 extra sps at each corner; join.
RNDS 14 & 15: Increase corner sps by 2 ch in each rnd.
RND 16: Make corner sps of 9-ch; all other sps of 11-ch; join.
RND 17: Ch 1, rsd-sc-Cl under same Cluster, 11 sc in each ch-11 sp around, rsd-sc-Cl under each sc-Cl, 10 sc in each 9-ch corner sp, (sc, dc, sc) in each corner dc-Cl; join.
RND 18: Ch 1, sc in same st, sc in next sc, * (ch 16, sk 9 sc, sc in next sc, sc in next Cluster, sc in next sc) repeated to corner dc, ch 16, sc in same dc, sc in next sc; repeat from * around; end with 1 sc, join to 1st sc.
RND 19: (21 sc in next lp, sl st in 2d sc between lps) repeated around.
RND 20: Sl st in 1st 9 sc on next lp, sc in next 3 sc, (ch 12, sc in 10th, 11th & 12th sc on next lp) repeated around: join to 1st sc, sl st in next sc.
RND 21: (16 sc in next lp, sl st in 2d sc between lps) repeated around; join and fasten off.
Starch Mat, then stretch and pin right-side-up in true shape. Press flat thru a cloth, then leave until dry.
FLOWER BASKET (Size-13 ½ inches square): Starting in center, cover 1 ring as for Mat.
RND 2: Without cutting thread, ch 7, (sk 3 sc, sc in next sc, ch 4, sk 3 sc, dc in next sc, ch 4) repeated around; join to 3d st of ch-7.
RND 3: Ch 1, 3 sc in same place, (5 sc in next sp, sc in next sc, 5 sc in next sp, 3 sc in corner dc) repeated around; join.
BORDER: Repeat as for Mat but in a square instead of a rectangle, - thru Rnd 21. Starch and block.
HANDLE: Ch 2, 9 sc in 2d ch from hook. Cup circle right side inside, sc in back lp of each sc around and around for 21 inches, having 9 sc in row at all times. Cut 4 wires 21 inches long. Hold tog. and wrap ends with gummed tape. Push wire inside Handle and close end with sl sts. Fasten off. Bend Handle into a loop with ends 3 inches apart and starch. Bend Basket cornerwise with right side outside. Snap ends of Handle to outside of Basket with dress snaps on opposite corners of Rnd 3 of Center, then snap Handle to opposite corners on edge of Basket.
CIGARETTE BASKET: Repeat Flower Basket thru Rnd 4 of Border.
RNDS 5 thru 10: Work as for Rnds 16 thru 21. Starch, block and bend as for Flower Basket.
HANDLE: Cut 1 wire 11 inches long. Wrap ends with gummed tape. Repeat Flower Basket Handle but with only 5 sc in rnds:-Make ½ inch of Handle, push one end of wire into it and continue working Handle around outside of wire until it is covered. Close with sl sts. Fasten off. Bend with ends 1 inch apart, starch and snap to outside of Basket as for Flower Basket.
BUN HOLDER: BASE: Starting in center, ch 5, join with sl st to form ring.
RND 1: Ch 1, 8 sc in ring; join to 1st sc with sl st.
RND 2: Ch 1, turn, 2 sc in same place, (sc in next sc, 3 sc in next sc) 3 times, sc in next sc, sc in same place with 1st 2 sc, join to 1st sc.
RND 3: Ch 1, turn, 2 sc in same place with sl st, * sc in each sc across, 3 sc in center sc at corner; repeat from * around; sc in same place with 1st 2 sc; join to 1st sc. Repeat Rnd 3 thru Rnd 22 (45 sc on each side, - corner sc to corner sc incl). Fasten off. Make two.
BORDER: RND 1: Attach to back lp of 1st of 3 sc at one corner of 1st Base, ch 1, sc in same st, * working in back lp, ch 3, dc in next (corner) sc, ch 3, sc in next sc, ch 13, sk 10 sc, sc in next sc, (ch 13, sk 9 sc, sc in next sc) twice, ch 13, sk 10 sc, sc in next sc; repeat from * around; join to 1st sc. Working in a square, repeat as for Rnds 2, 3, 4 and 16 thru 21 of Place Mat border.
TOP: With edge facing, attach to remaining lp of a corner sc on Base, en 1, sc in same place, * (ch 13, sc in front lp of sc above next Cluster) 3 times, ch 13, sc in corner sc; repeat from * around (16 sps); join to 1st sc.
RND 2: Ch 1, rsd-sc-Cl under same sc, (ch 13, rsd-sc-Cl under next sc) repeated around; join. Repeat Rnd 2 four times, then 2 rnds of ch-14 sps, 1 rnd of ch-15 sps and 1 rnd of ch-13 sps.
RND 11: Ch 1, sc in same st, (12 sc in next sp, rsd-sc-Cl under next Cluster) repeated around; join.
RND 12: Ch 1, sc in same st, sc in next sc, (ch 16, sk 10 sc, sc in next sc, sc in Cluster, sc in next sc) repeated around; join. Repeat Rnds 19, 20 & 21 of Place Mat.
HANDLE: Repeat Flower Basket Handle for 5 ¼ inches. Fasten off. Cover a ring (as for Mat) and sew to starting end. Cut 4 wires 5 ¼ inches long plus length from center to a corner of Base. Hold tog. and tape 1 end, insert in Handle, put other end thru center of 1st Base, sew bottom of Handle to Base, bend each wire at right angle under Base, tape each end and tack one out to each corner of Base. Place 2d Base back-to-back under 1st Base and sew tog. around edge. Starch Basket. Stretch and pin bottom down in true square. Cut a square of heavy cardboard to fit inside Basket. Cut a hole in center, slip over Handle and pin down on Base.
Cut 4 tapered cardboard pieces to fit sides of Basket, tape corners tog. to fit inside Basket. Lace string thru top lps and across top of cardboard to pull sides of Basket up taut. Let stand until dry.
NAPKIN: Cut a 13 ½ inch square of linen, hem edge, cut a 1 ½ inch hole in center, hem edge of hole, slip hole over Handle and arrange napkin with a corner over each side of Bun Holder.
Other great patterns from Wrought Iron Crochet, Lily Book 74:
Crochet Patterns
Trivet Wall Plaques
Flower Holder & Candlesticks
Beverage Set
Rooster
Grape Lattice Place Mat
Black Magic Luncheon Set
Round Doily
Oval Place Mat
Oval Doily
Luncheon Set
Card Table Accessories
Cookie Basket & Cigarette Basket
Pot Holder Set
Butterfly Wall Plaques
Pair of Candlesticks
Flower Holder