Newly Added Crochet Patterns
Practical Hot Dish Mats Pattern

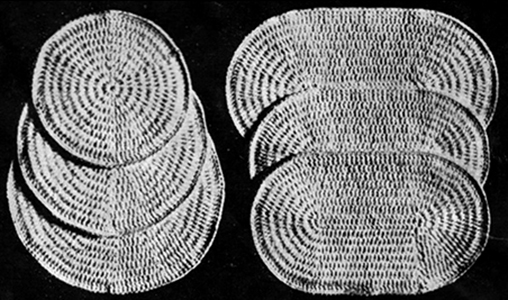
These crocheted hot dish mats are heavy enough to protect your table from the hottest plates and dishes.
Generally made in sets of three—a large, medium and small round mat, or a large and two smaller oval mats to the set.
2 balls of Enterprise yarn will make a set of round mats. 3 balls will make a set of oval mats. Plain white is suggested for formal table settings, but colored stripes or motifs, or solid colors to match your color scheme in the new fancy dishes, will appeal to many.
No. 3 or 5 Steel Crochet Hook. Use size needed for a tight stitch.
ROUND MATS
The 12 row instructions given below will make a mat approximately 8½ inches in diameter—crochet tightly to get thickness. More rows may be added to make larger mats—follow the same procedure as in "Rows 6 to 12" and then add the edge.
*NOTE: These round and oval mats are made by working between the stitches and over a "running thread" which is carried on the underside of the work—this tends to give added protection, and if drawn up slightly, as work progresses, will hold it firm.
DIRECTIONS: Ch 5, sl st to form a ring. Attach running thread from here on—
Row 1: Ch 3, 11 dc in ring, sl st to 3rd st of ch-3 (12 dc).
Row 2: Ch 3, * 2 dc in space between dc * repeat 10 times, 1 dc in last sp, sl st to ch-3 (24 dc).
Row 3: Ch 3, 1 dc in first sp, 1 dc in next sp, * 2 dc in next sp, 1 dc in next sp * repeat 10 times, sl st to ch-3 (36 dc).
Row 4: Ch 3, 1 dc in each of first 3 sps, * 2 dc in next sp, 1 dc in each of next 2 sps * repeat 10 times, sl st to ch-3 (48 dc).
Row 5: Ch 3, 1 dc in first 4 sps, * 2 dc in next sp, 1 dc in next 3 sps * repeat 10 times sl st to ch-3 (60 dc).
Rows 6 to 12 inclusive: Continue in the same manner, adding 12 dc in every row, having the 2 dc in each row over the 2 dc of previous row.
Edge: 1 sc in each dc around mat. Fasten off.
For the smaller mats, reduce the number of rows to 10 (approximately 7 inches diameter) and 8 (approximately 6 inches diameter) respectively, and then attach the sc edge.
OVAL MATS
The 9 row instructions given below will make a mat approximately 10½ by 6½ inches. Add more, rows to make larger mats—follow the same procedure as in "Rows 5 to 9" and then add the edge.
NOTE: See Note * on "Round Mats."
DIRECTIONS: Ch 30, 1 dc in 4th st from hook, 1 dc in next 26 sts (28 dc) ch 1, 4 sc over last dc, ch 1, 1 sc in space after each dc on other side (26 sc) ch 1, 4 sc over 3 ch, ch 1, 1 sc between each dc on other side (26 sc).
Row 2: Ch 3, 1 dc in ch 1, 2 dc in each of 4 sc, 2 dc in ch 1 (12 dc on end), 1 dc in each of next 27 sc, 2 dc in ch 1, 2 dc in each of 4 sc, 2 dc in ch 1, 1 dc in each sc on other side (26 dc) sl st to ch-3.
Row 3: Ch 3, 1 dc in next 2 sps, ** 2 dc in next sp, 1 dc in next sp * repeat from ** 4 times, (18 dc on end), 1 dc in next 27 sps, ** repeat between ** and sl st to ch-3.
Row 4: Ch 3, 1 dc in next 3 sps, ** 2 dc in next sp, 1 dc in next 2 sps * repeat from ** 4 times, (24 dc on end), 1 dc in next 27 sps ** repeat from ** and sl st to ch-3.
Rows 5 to 9: Continue in the same manner, adding 6 dc on the ends of each row, having the 2 dc over 2 dc of previous row.
Edge: 1 sc in each dc around mat. Fasten off.
For smaller mats, approximately 6 by 9½ inches, ch 26 to start mat and follow same procedure as for large mat and work the sc edge after the 8th row.
Striped Bedroom Rug Pattern
Sugar 'N Cream Pot Holder Patterns
Pots and Pans Pot Holder Patterns
Hearts Pot Holder Pattern
Diamonds Pot Holder Pattern
Bag Pattern
Crocheted Chenille Rug Pattern
Hot Dish Mats Pattern
Barbecue Mitts Pattern
Floral Rug Patterns
Super Absorbent Coasters Pattern
V's Table Mat Set Patterns
Blocks and Bands Table Mat Set Patterns
Lantana Blossoms Table Mat Set Patterns
Colonial Rug and Chair Seat Set Patterns
Kitten and Bunny Rug Pattern
Dutch Boy and Girl Rug Pattern
Initials in Puff Stitch Patterns
Hot Plate Mat and Pot Holder Patterns
Fluffy Puppy Toy Pattern
Posy Glass Muffs Pattern
Practical Hot Dish Mats Pattern
Chair Set and Placement Set Patterns
Mid-Riff Sweater Pattern
Soaker Pattern
Soaker Pattern
Dusting Glove Pattern
Shaggy Bearskin Rug Pattern


