Jolly St. Nick Pattern

There are slight variations to materials and instructions between these two versions of the same pattern in different publications. Two versions are below.
Star #94, Crochet For Christmas
Materials Required:
AMERICAN THREAD COMPANY “AUNT LYDIA’S” HEAVY RUG YARN, Article 235
7 skeins Red
2 skeins White
3 Black buttons
10 inches ½ inch black ribbon
Aluminum crochet hook No. H
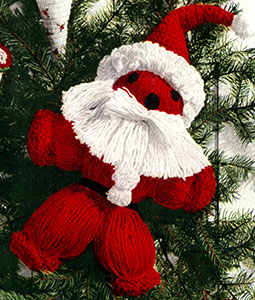
BODY—Wind 4 skeins of Red over a 16 inch cardboard, tie with double strand of yarn at one end for top of head. Tie tightly about 3½ inches from top of head for neck. Divide remaining yarn in half for legs and tie each section about 2 inches from each end. Cut and trim ends for feet.
ARMS—Wind 2 skeins of Red over a 12 inch cardboard, tie 2 inches from each end for hands, then tie each side about 3½ inches from each hand for shoulders, insert through center of body. Tie about 4½ inches from neck for waist. Cut and trim ends for hands.
MUSTACHE—Cut 14 — 5 inch lengths of White. Insert threaded needle through center of each length, pull together and fasten on wrong side. Comb and trim edges tapering top to about 4 inches.
BEARD—With White ch 19 loosely, cut yarn. Cut 57 — 6 inch lengths and pull 3 lengths evenly through each st of ch. Fold lengths in half and tack in position on wrong side. Comb and trim edges as illustrated. Sew mustache and beard to face.
HAT CUFF—With White ch 40, join to form a ring being careful not to twist ch.
1st Round—Work 1 double loop st in each st (double loop st: yarn over index finger twice, insert hook in st, draw yarn through pulling yarn from index finger, drop loop from finger letting loops fall to right side of work and complete s c), do not turn or join this or following rounds. Place a marker at the beginning of each round. Repeat the last round twice, cut yarn.
4th Round—Attach Red and working in s c, decrease 5 sts evenly spaced (to decrease: * insert hook in next st, pull loop through, repeat from * once, yarn over and work off all loops at one time).
5th and 6th Rounds—1 s c in each s c. Repeat the last 3 rounds 4 times.
19th Round—Decrease 3 sts. Work 2 rounds even. Repeat last 3 rounds twice.
28th Round—Decrease 2 sts, cut yarn.
POMPONS—Over a 3 inch cardboard wind White 30 times. Tie in center, cut each end and trim. Make 2 more pompons in same manner. Sew to point of hat and body as illustrated. Sew hat in position.
BELT—Place ribbon around center of body and sew edges together at back.
Sew buttons in position for eyes and nose.
Star #135, Gift Items
Materials Required: AMERICAN THREAD COMPANY
"AUNT LYDIA'S" HEAVY RUG YARN, Article 235
4 skeins Red
1 skein White
1 spool "AUNT LYDIA'S" Carpet and Button Thread
10 inches x 10 inches Red Felt
BODY: Wind 3 skeins of Red over a 12 inch cardboard, tie with a double strand of yarn at one end for top of head. Tie tightly about 3 inches from top of head for neck.
ARMS: Wind 1 skein of Red over a 10 inch cardboard, tie 1½ inches from each end for hands, insert through center of body. Tie under arms for waist. Cut and trim ends for hands.
Divide remaining yarn in half for legs and tie each section about 2 inches from each end. Cut and trim ends for feet.
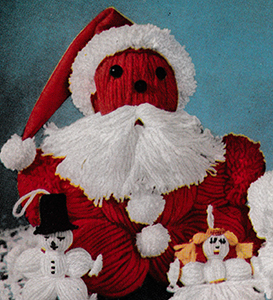
MUSTACHE: Cut 14 — 4 inch lengths of White. Insert threaded needle through center of each length, pull together and fasten on wrong side. Comb and trim edges tapering top to about 4 inches. Sew to face.
BEARD: Cut 50 — 5 inch lengths of White. Insert threaded needle through center of each length. Place beard in position and sew to face along center of lengths. Fold upper part of lengths downwards. Comb and trim edges as illustrated.
HAT: Cut Felt to form triangle 10 inches wide and 10 inches on each side rounding slightly at lower edge. Sew the 2 straight edges together. Mark dots ½ inch apart and ½ inch up from lower edge of hat.
TUFTS FOR HAT: Cut 12 — 1½ inch lengths of White. Insert a needle with "AUNT LYDIA'S" Carpet and Button Thread in one of the dots fastening firmly, place a tuft over the thread and sew center of the tuft to the hat using 2 or 3 stitches. Work 19 more tufts in same manner. Sew hat in position as illustrated. Sew buttons in position for eyes and nose or embroider with "STAR" SIX STRAND MERCERIZED EMBROIDERY COTTON.
POMPONS: Over a 3 inch cardboard wind White 20 times. Tie in center, cut each end and trim. Make 2 more pompons in same manner. Sew to point of hat and body as illustrated.

Bun Warmer & Glass Jacket Pattern
Tree Pot Holder Pattern
Tree Top Angel Pattern
Fairy Princess Doll Pattern
Mary Christmas Doll Pattern
Santa Claus Doll Pattern
Jolly St. Nick Pattern
Mr. Snow Man Pattern
Mr. & Mrs. Santa Lapel Pins Pattern
Cornucopia Ornament Pattern
Santa Claus Star Ornament Pattern
Snowflake Ornament Pattern
Snowflake Ornament Pattern
Snowflake Ornament Pattern
Green, White & Red Bells Ornament Pattern
Holly Wreath Curtain Pulls Pattern


