Newly Added Crochet Patterns
Little Hen Pot Holder Pattern

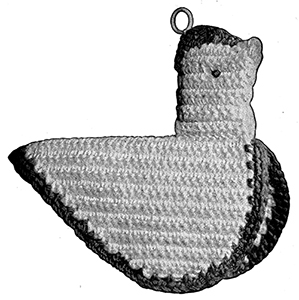
A little hen to "set" upon the handle of hottest pots and pans • you'll "hatch" no burned fingers with this nifty holder for protection.
MATERIALS: 80 yds. of White Enterprise Yarn and about 30 yds. of color to match the kitchen for the trim, for each hen.
BODY: With White ch 33, 32 sc in ch.
ROW 2: Ch 1, 32 sc.
ROW 3: Ch 1, sc in 31 sc (a dec of 1 st at tail).
ROW 4: Ch 1, sk 1, sc in 30 sts.
Repeat Rows 3 and 4 for 10 rows in all (24 sc in Row 10).
ROW 11 through 16: Dec 1 sc every other row at front and every row at tail, (15 sc in Row 16).
ROWS 17 and 18: Ch 1, sk last sc, sc in 12 (dec of 2 sts end of each row).
ROW 19: Ch 1, sk 1 sc, sc in 7. This completes one side of body. Fasten off. Join White to first st (of 32 sts) and at front of body, work 32 sc and make second side.
EDGE: With color, sc in front end of Row 1 of body, (ch 1, sc bet next 2 rows) repeat around. Sl st to first sc.
ROW 2: Ch 1, and work sc over each ch-l of previous row with ch 1 bet sc. Inc of ch 1, sc in same st where needed. Steam and press body. For increased protection, pad body with flannel and line.
HEAD: Make 2—With White ch 12, 11 sc on ch. Ch 1, sk last sc, sc in 10 sc. Ch 1, sk last sc, sc in 9 sc. Ch 1, sc in last 9. Ch 2, sk 1 st of ch, sc in 10 sts. Ch 1, 10 sc. Ch 2, sk 1 st, 11 sc. Ch 1, sk 1, sc in 10 sc. Ch 2, sk 1 st, 11 sc. Ch 1, sk 1, sc in 10. Ch 2, sl st in last 3 sc, sc in 7 sc. Fasten off.
Sew together at sides and around top and stuff slightly. Sew to first 11 sts on each side at front of body.
COMB: With color, sl st to fourth st from point of bill, sl st in next, (sc, hdc, dc) in 3 sts, 2 dc in 2, dc in end of next 2 rows down back of head dc, sc, in next 2. Fasten off. Sew bone ring to comb and embroider eye as illustrated.
Little Hen Pot Holder Pattern
Panties and Shorts Pot Holder Patterns
Emblems Pot Holder Patterns
Fan Pot Holder Pattern
Star Spangled Glass Jackets Pattern
Star Coasters Pattern
Roll Rim Coasters Pattern
Good Luck Coasters Pattern
Ruffled Glass Jackets Pattern
Poppy Pot Holder Pattern
Spring Blossoms Set Patterns
Morning, Noon 'N Nite Pot Holder Patterns
Duck Pot Holder Pattern
Funny Faces Pot Holder Patterns
Lattice Pot Holder Pattern
Rick Rack Pot Holder Pattern
Cats and Dogs Pot Holder Patterns
Flowers Pot Holder Pattern
Jackets for Glasses Pattern
Jugs on a Rack Pot Holder Patterns
Fish Pot Holder Pattern
Pin Wheels in a Basket Pot Holder Patterns
Acorn Oven Mitt Pattern
Paddle Oven Mitt Patterns
Cross Stitch Oven Mitt Pattern
Crocheted Cottage Pot Holder Pattern
Cross Stitched Cottage Pot Holder Pattern
Round in Puff Stitch Set Patterns
Puff Stitch Pot Holder Patterns
Tea Pot and Stand Pot Holder Patterns
Kitten Bib Pattern
Goblet Slippers Pattern
Mat Pattern
Drip Catchers Coasters Pattern
Posy Glass Muffs Pattern
Hearts Pot Holder Pattern
Diamonds Pot Holder Pattern
Cross Stitched Squares Pot Holder Patterns
Sugar 'N Cream Pot Holder Patterns
Colonial Cottage Pot Holder Pattern
Posy Pot Holder Pattern
Humpty Dumpty Set Patterns
Scottie Dog Set Patterns


