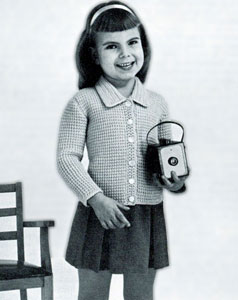
Watch the Birdie Jacket Sweater Pattern

The popular crochet afghan stitch is featured in this pretty little jacket with set-in sleeves and an interesting collar
Directions are given for Size 2. Changes for Sizes 3 and 4 are in parentheses.
COATS & CLARK'S "RED HEART" KNITTING WORSTED, 4 Ply, Art. E. 230-B (2 oz."Tangle-Proof" Pull-Out Skeins): 4 (4, 5) skeins of No. 679 Nile Green.
Afghan Hook No. 6.
6 buttons.
GAUGE: 4 sts = 1 inch; 7 rows = 2 inches.
BLOCKING MEASUREMENTS: |
|||
Sizes |
2 |
3 |
4 |
Body Chest Size (In Inches) |
|||
21 |
22 |
23 |
|
Actual Knitting Measurements |
|||
Chest |
23 |
24 |
25 |
Width across back at underarm |
|||
11 |
11½ |
12 |
|
Width across back above armhole shaping |
|||
9½ |
10 |
10½ |
|
Width across each front at underarm |
|||
(incl front band) |
6½ |
6¾ |
7 |
Length from shoulder to lower edge |
|||
13 |
14 |
15 |
|
Length of side seam |
8½ |
9¼ |
10 |
Length of sleeve seam |
9 |
10 |
11 |
Width across sleeve at upper arm |
|||
9 |
9½ |
10 |
|
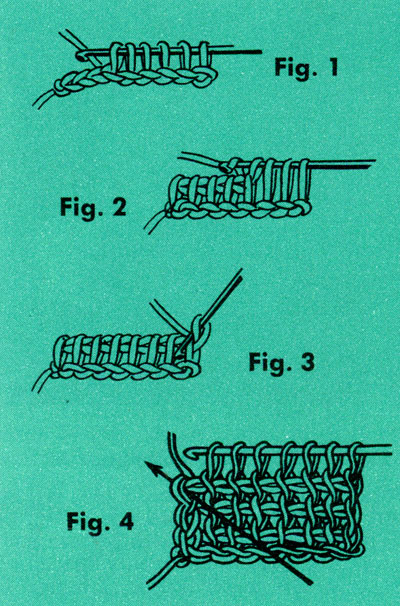
BACK … Starting at lower edge, ch 45 (47, 49). 1st row-First Half of Row: Retaining all loops on hook, draw up a loop in 2nd ch from hook and in each ch across (Fig. 1). There are the same number of loops on hook as there were chain sts. Second Half of Row: Yarn over and draw through 1 loop, * yarn over and draw through 2 loops. Repeat from * across (Fig. 2). The loop which remains always counts as the first st of next row (Fig. 3). 2nd row—First Half of Row: Retaining all loops on hook, draw up a loop in 2nd vertical bar (formed by loop of previous row) and in each bar across to within last vertical bar (Fig. 4); insert hook through last vertical bar and the st directly behind it (arrow on Fig. 4) and draw up a loop (this gives a firm edge to this side). There are the same number of loops as on first row. Complete row same as Second Half of first row. Repeat 2nd row for pattern. Work even in pattern until total length is 8½ (9¼, 10) inches.
Armhole Shaping—1st row: Bind off 2 sts at beg of row—to bind off, skip first bar, sl st loosely in next 2 bars; drawup a loop in each bar across to last 2 bars (do not work in last 2 bars). There are 41 (43, 45) loops on hook. Complete Second Half of row—2 sts bound off at both ends of row. Dec 1 st at both ends of every other row 2 (2, 3) times in all—to dec 1 st, insert hook under 2 vertical bars and draw up one loop. Work even on 37 (39, 39) sts until length is 4½ (4¾, 5) inches from first row of armhole shaping.
Shoulder Shaping: 1st row: Sl st loosely in next 11 (12, 12) bars, work across next 15 sts (do not work in remaining sts), complete 2nd half of row across center 15 sts for back of neck. 2nd row: Sl st across center sts and remaining 11 (12, 12) bars. Break off and fasten.
Left Front … Starting at lower edge ch 24 (25, 26). Work in pattern as for Back to armhole shaping.
Armhole Shaping: 1st row: Bind off 2 sts at beg of row once (side edge); then dec 1 st at same edge every other row 2 (2, 3) times in all—20 (21, 21) sts remain.
Neck Shaping: Keeping side edge straight, dec 1 st at neck edge on next row and every row thereafter, 9 times in all—11 (12, 12) sts remain. If necessary work even until length from first row of armhole shaping is 4½ (4¾, 5) inches, ending at side edge.
Shoulder Shaping: 1st row: Bind off 11 (12, 12) sts, sl st in each remaining bar. Break off and fasten.
RIGHT FRONT … Work as for Left Front, reversing shaping (when shaping armhole and shoulder, dec at end instead of beg of row).
SLEEVES … Starting at lower edge, ch 27 (29, 31). Work in pattern as for Back, inc 1 st at both ends of every 5th row 5 times in all—to inc 1 st, draw up a loop in the chain st between the vertical bars. Work even on 37 (39, 41) sts until total length is 9 (10, 11) inches.
Top Shaping: Bind off 2 sts at both ends of next row. Dec 1 st at both ends of every row until length from first row of top shaping is 2½ (3, 3½) inches. Sl st loosely in each remaining bar. Break off and fasten.
Block to measurements. Sew side, shoulder and sleeve seams. Sew in sleeves.
BORDER ... 1st rnd: With right side facing, attach yarn at front edge of lower edge and sc evenly around lower edge, one front, neck and other front edge, making 3 sc in each corner. Join to first sc.
NOTE: Buttonholes are made on Left Front for boys and on Right Front for girls.
Buttonhole Band: 1st row: With right side facing, sc across front edge (from lower edge to start of neck shaping). Ch 1, turn. 2nd row: Sc in each sc across. Ch 1, turn. With pins mark the position of 6 buttonholes evenly spaced on front band, having the first pin ½ inch above lower edge and the last one ½ inch below neck edge. 3rd row: (Sc to next pin, ch 2, skip next 2 sc) 6 times, sc to end of row. Ch 1, turn. 4th row: Sc in each sc and each ch across. Ch 1, turn. 5th row: Sc in each sc across. Break off and fasten. Buttonband: Work 5 rows of sc's across other front edge.
COLLAR ... 1st row: With right side facing sc evenly across entire neck edge. Ch 1, turn. Next 7 rows: Sc in each sc across. At end of last row omit ch 1. Break off and fasten. With right side facing, sc across one narrow edge of collar, make 3 sc in corner, sc in each sc across long edge, 3 sc in corner, sc across other narrow edge. Break off and fasten. Press lightly.

Petal Yoke Cardigan Pattern
Country Weekend Sweater Pattern
Junior League Jacket Sweater Pattern
Time for Tea Cardigan Pattern
Chairman of the Board Cardigan Pattern
School Recess Raglan Cardigan Pattern
Greenwich Village Blouse Sweater Pattern
Mountain Cabin V-Neck Sweater Pattern
Student Leader Boat Neck Sweater Pattern


